Note
Go to the end to download the full example as a Python script or as a Jupyter notebook..
To screenshot#
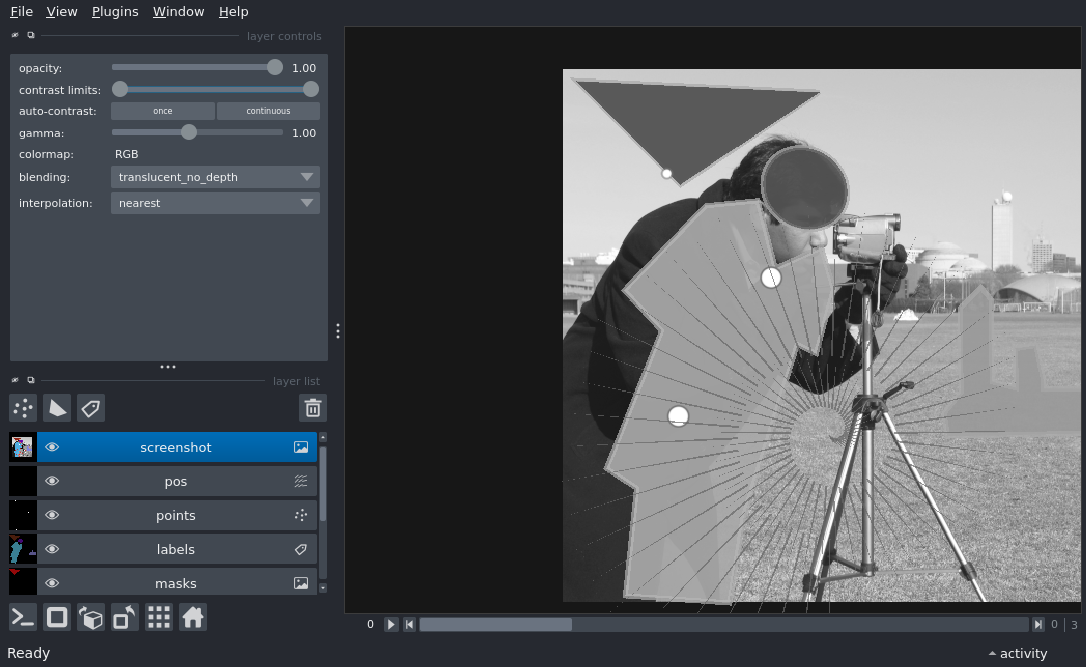
Display a variety of layer types in the napari viewer and take a screenshot of the viewer canvas with viewer.screenshot(). The screenshot is then added back as an image layer.
Screenshots include all visible layers, bounded by the extent of the canvas, and is functional for 2D and 3D views. To capture the extent of all data in 2D view, see viewer.export_figure(): Export Figure and Comparison of Screenshot and Figure Export.
This example code demonstrates screenshot shortcuts that do not include the viewer (e.g. File -> Copy Screenshot to Clipboard). To include the napari viewer in the screenshot, use viewer.screenshot(canvas_only=False) or e.g. File -> Copy Screenshot with Viewer to Clipboard).

import numpy as np
from skimage import data
from vispy.color import Colormap

import napari

# create the viewer and window
viewer = napari.Viewer()

# add the image
img_layer = viewer.add_image(data.camera(), name='photographer')
img_layer.colormap = 'gray'

# create a list of polygons
polygons = [
    np.array([[11, 13], [111, 113], [22, 246]]),
    np.array(
        [
            [505, 60],
            [402, 71],
            [383, 42],
            [251, 95],
            [212, 59],
            [131, 137],
            [126, 187],
            [191, 204],
            [171, 248],
            [211, 260],
            [273, 243],
            [264, 225],
            [430, 173],
            [512, 160],
        ]
    ),
    np.array(
        [
            [310, 382],
            [229, 381],
            [209, 401],
            [221, 411],
            [258, 411],
            [300, 412],
            [306, 435],
            [268, 434],
            [265, 454],
            [298, 461],
            [307, 461],
            [307, 507],
            [349, 510],
            [352, 369],
            [330, 366],
            [330, 366],
        ]
    ),
]

# add polygons
layer = viewer.add_shapes(
    polygons,
    shape_type='polygon',
    edge_width=1,
    edge_color='coral',
    face_color='royalblue',
    name='shapes',
)

# change some attributes of the layer
layer.selected_data = set(range(layer.nshapes))
layer.current_edge_width = 5
layer.opacity = 0.75
layer.selected_data = set()

# add an ellipse to the layer
ellipse = np.array([[59, 222], [110, 289], [170, 243], [119, 176]])
layer.add(
    ellipse,
    shape_type='ellipse',
    edge_width=5,
    edge_color='coral',
    face_color='purple',
)

masks = layer.to_masks([512, 512])
masks_layer = viewer.add_image(masks.astype(float), name='masks')
masks_layer.opacity = 0.7
masks_layer.colormap = Colormap([[0.0, 0.0, 0.0, 0.0], [1.0, 0.0, 0.0, 1.0]])

labels = layer.to_labels([512, 512])
labels_layer = viewer.add_labels(labels, name='labels')

points = np.array([[100, 100], [200, 200], [333, 111]])
size = np.array([10, 20, 20])
viewer.add_points(points, size=size)

# sample vector coord-like data
n = 100
pos = np.zeros((n, 2, 2), dtype=np.float32)
phi_space = np.linspace(0, 4 * np.pi, n)
radius_space = np.linspace(0, 100, n)

# assign x-y position
pos[:, 0, 0] = radius_space * np.cos(phi_space) + 350
pos[:, 0, 1] = radius_space * np.sin(phi_space) + 256

# assign x-y projection
pos[:, 1, 0] = 2 * radius_space * np.cos(phi_space)
pos[:, 1, 1] = 2 * radius_space * np.sin(phi_space)

# add the vectors
layer = viewer.add_vectors(pos, edge_width=2)

# take screenshot
screenshot = viewer.screenshot()
# optionally for saving the exported screenshot: viewer.screenshot(path="screenshot.png")
viewer.add_image(screenshot, rgb=True, name='screenshot')

if __name__ == '__main__':
    napari.run()