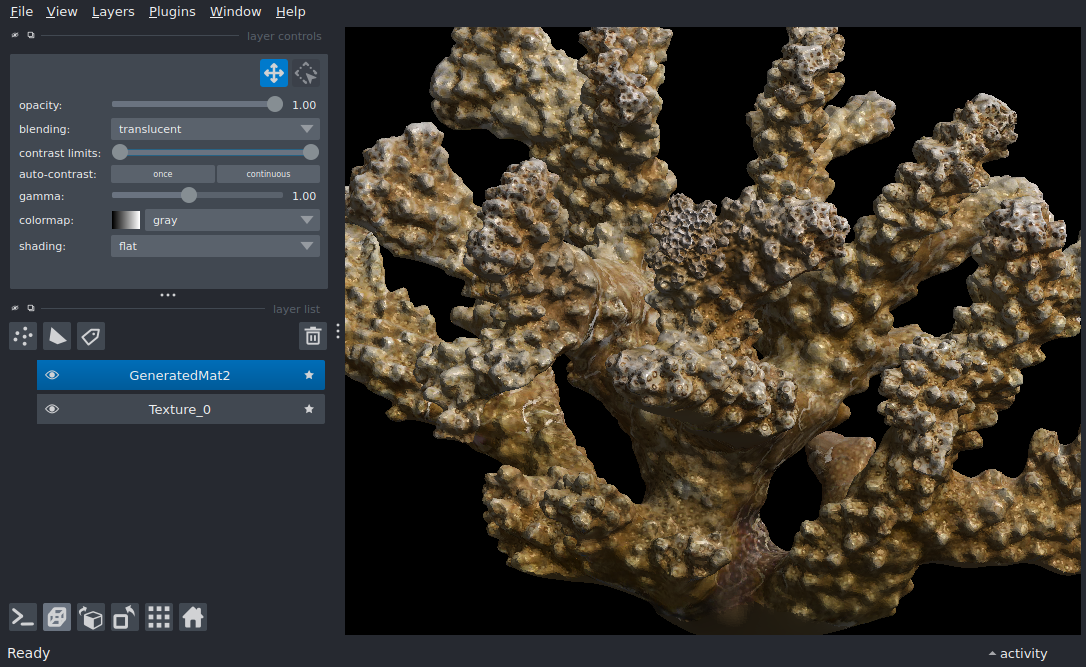
Surface with multiple textures#
This example demonstrates one possible method for displaying a 3D surface with multiple textures.
Thanks to Emmanuel Reynaud and Luis Gutierrez for providing the gorgeous coral model for this demo. You can find the data on FigShare: https://zenodo.org/records/13380203
More information on the methods used to generate this model can be found in L. Gutierrez-Heredia, C. Keogh, E. G. Reynaud, Assessing the Capabilities of Additive Manufacturing Technologies for Coral Studies, Education, and Monitoring. Front. Mar. Sci. 5 (2018), doi:10.3389/fmars.2018.00278.
A bit about 3D models#
A standard way to define a 3D model (mesh, or Surface in napari) is by listing vertices (3D point coordinates) and faces (triplets of vertex indices - each face is a triangle in 3D space). Meshes are often stored in “Wavefront” (.obj) files, which may have companion material (.mtl) files that describe some shading properties (base color, shinyness, etc.) for different parts of the model.
In some cases, the color of a vertex is given by a single point value that is then colormapped on the fly (vertex_values). In other cases, each vertex or face may be assigned a specific color (vertex_colors). These methods are demonstrated in Surface with texture and vertex_colors.
In the case of “photorealistic” models, the color of each vertex is instead determined by mapping a vertex to a point in an image called a texture using 2D texture coordinates in the range [0, 1]. The color of each individual pixel is smoothly interpolated (sampled) on the fly from the texture (the GPU makes this interpolation very fast).
Napari does not (yet) support models with multiple textures or materials. If the textures don’t overlap, you can display them on separate meshes as shown in this demo. If the textures do overlap, you may instead be able to combine the textures as images. This relies on textures having the same texture coordinates, and may require resizing the textures to match each other.
Extra packages required
This example requires additional packages that are not available in typical
napari installations.
For this example to work in recommended napari installations,
you will need to install additional packages: matplotlib.
See the plugin manager guide
for ways to install additional packages from within napari.
Download the model#
download = pooch.DOIDownloader(progressbar=True)
doi = '10.5281/zenodo.13380203'
tmp_dir = pooch.os_cache('napari-surface-texture-example')
os.makedirs(tmp_dir, exist_ok=True)
data_files = {
    'mesh': 'PocilloporaDamicornisSkin.obj',
    # "materials": "PocilloporaVerrugosaSkinCrop.mtl",  # not yet supported
    'Texture_0': 'PocilloporaDamicornisSkin_Texture_0.jpg',
    'GeneratedMat2': 'PocilloporaDamicornisSkin_GeneratedMat2.png',
}
data_to_path = {}
print(f'downloading data into {tmp_dir}')
for id_, file_name in data_files.items():
    res = pooch.retrieve(f'doi:{doi}/{file_name}', known_hash=None,  progressbar=True)
    data_to_path[id_] = res
downloading data into /home/runner/work/docs/docs/.cache/napari-surface-texture-example
Downloading...
From: https://drive.google.com/uc?id=1yuPHWlLzowlfWzVMUg-mvAEe_Tmvpzy4
To: /home/runner/work/docs/docs/.cache/pooch/tmpom9pigdu

  0%|          | 0.00/93.8M [00:00<?, ?B/s]
  3%|▎         | 2.62M/93.8M [00:00<00:03, 26.0MB/s]
  7%|▋         | 6.82M/93.8M [00:00<00:03, 25.6MB/s]
 17%|█▋        | 16.3M/93.8M [00:00<00:01, 51.0MB/s]
 23%|██▎       | 22.0M/93.8M [00:00<00:01, 38.6MB/s]
 32%|███▏      | 29.9M/93.8M [00:00<00:01, 45.8MB/s]
 41%|████      | 38.3M/93.8M [00:00<00:01, 55.2MB/s]
 52%|█████▏    | 48.8M/93.8M [00:00<00:00, 63.4MB/s]
 59%|█████▉    | 55.6M/93.8M [00:01<00:01, 36.8MB/s]
 68%|██████▊   | 64.0M/93.8M [00:01<00:00, 43.6MB/s]
 78%|███████▊  | 72.9M/93.8M [00:01<00:00, 52.0MB/s]
 88%|████████▊ | 82.3M/93.8M [00:01<00:00, 53.8MB/s]
100%|█████████▉| 93.3M/93.8M [00:01<00:00, 65.6MB/s]
100%|██████████| 93.8M/93.8M [00:01<00:00, 51.6MB/s]
Downloading...
From: https://drive.google.com/uc?id=17tG44rMPWjAIoO_AlH9BaQkPY7GxxEN9
To: /home/runner/work/docs/docs/.cache/pooch/tmpg72666aa

  0%|          | 0.00/17.3M [00:00<?, ?B/s]
  3%|▎         | 524k/17.3M [00:00<00:03, 4.21MB/s]
 39%|███▉      | 6.82M/17.3M [00:00<00:00, 34.3MB/s]
 61%|██████    | 10.5M/17.3M [00:00<00:00, 32.1MB/s]
 82%|████████▏ | 14.2M/17.3M [00:00<00:00, 30.8MB/s]
100%|██████████| 17.3M/17.3M [00:00<00:00, 27.8MB/s]
Downloading...
From: https://drive.google.com/uc?id=1l_hGxDg6JARAyFMgWXuoIZs49qKXBv01
To: /home/runner/work/docs/docs/.cache/pooch/tmpuncp0ufu

  0%|          | 0.00/120k [00:00<?, ?B/s]
100%|██████████| 120k/120k [00:00<00:00, 1.69MB/s]
Load the model#
Next, read the model data from the .obj file. Currently napari/vispy do not support reading material properties (.mtl files) nor separate texture and vertex indices (i.e. repeated vertices). Normal vectors read from the file are also ignored and re-calculated from the faces.
Notice reading .OBJ: material properties are ignored.
Load the textures#
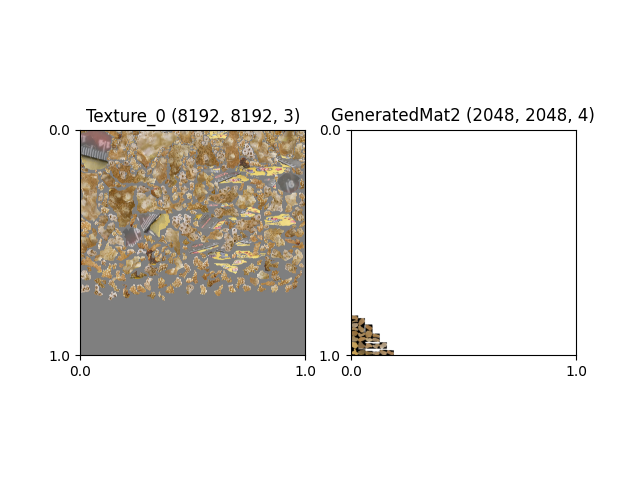
This model comes with two textures: Texture_0 is generated from photogrammetry of the actual object, and GeneratedMat2 is a generated material to fill in parts of the model lacking photographic texture.
photo_texture = imread(data_to_path['Texture_0'])
generated_texture = imread(data_to_path['GeneratedMat2'])
This is what the texture images look like in 2D:
fig, axs = plt.subplots(1, 2)
axs[0].set_title(f'Texture_0 {photo_texture.shape}')
axs[0].imshow(photo_texture)
axs[0].set_xticks((0, photo_texture.shape[1]), labels=(0.0, 1.0))
axs[0].set_yticks((0, photo_texture.shape[0]), labels=(0.0, 1.0))
axs[1].set_title(f'GeneratedMat2 {generated_texture.shape}')
axs[1].imshow(generated_texture)
axs[1].set_xticks((0, generated_texture.shape[1]), labels=(0.0, 1.0))
axs[1].set_yticks((0, generated_texture.shape[0]), labels=(0.0, 1.0))
fig.show()
Create the napari layers#
Next create two separate layers with the same mesh - once with each texture. In this example the texture coordinates happen to be the same for each texture, but this is not a strict requirement.
photo_texture_layer = napari.layers.Surface(
    (vertices, faces),
    texture=photo_texture,
    texcoords=texcoords,
    name='Texture_0',
)
generated_texture_layer = napari.layers.Surface(
    (vertices, faces),
    texture=generated_texture,
    texcoords=texcoords,
    name='GeneratedMat2',
)
Add the layers to a viewer#
Finally, create the viewer and add the Surface layers. sphinx_gallery_thumbnail_number = 2
viewer = napari.Viewer(ndisplay=3)

viewer.add_layer(photo_texture_layer)
viewer.add_layer(generated_texture_layer)

viewer.camera.angles = (70, -20, 5)
viewer.fit_to_view()

if __name__ == '__main__':
    napari.run()
/home/runner/work/docs/docs/.venv/lib/python3.12/site-packages/napari/_qt/qt_event_loop.py:50: UserWarning: System theme detection requires a Qt6 backend. Please switch to PyQt6 or PySide6 to use it.
  theme_type=get_system_theme(),
Total running time of the script: (0 minutes 27.005 seconds)