Goal: Get napari installed and open your first images.
Welcome
Introduce instructors and helpers
Share the Code of Conduct
Ask about accessibility needs (private DMs ok)
Share the Zulip #napari-workshop-[DATE] stream link with participants; for online sessions, post it in the meeting chat, and for in-person sessions, display or distribute the link. Invite participants to post an introduction: “What field are you from, and what kind of images do you work with?”
Online participation (if applicable)
Cameras can make online sessions more engaging, but are optional
👍 reaction = ready to continue; ✋ = stuck or have a question
Ask questions in the meeting chat where everyone can see them, unless they need to be private
Download napari
napari comes as a bundled application — a single installer, just like any other desktop app. No Python or command line required.
Download: Go to napari.org and download the installer for your OS (Windows, macOS, or Linux).
Install: Run the installer and follow the on-screen prompts.
Launch: Open napari from your Applications folder / Start Menu / desktop shortcut.
About napari
napari is a free, open-source, multi-dimensional image viewer for Python and scientific image analysis. It is:
Community-driven — built by scientists, for scientists
Extensible — hundreds of plugins on napari-hub.org
Interoperable — works with NumPy arrays, tiff files, zarr, and more
Interactive — explore and annotate your data with a handy GUI
Install the downloaded bundle
napari Demo
During this demo, just watch — you don’t need to follow along yet. Focus on seeing what napari can do, not on reproducing every step. You’ll have plenty of hands-on time shortly.
Installation Check-in
Everyone should now have napari open. You should see:
An empty canvas in the center
A layer list panel on the left
A layer controls panel on the top-left
Viewer buttons at the bottom of the canvas
If napari is open, signal you’re ready to continue (for example, raise a hand in person or use a 👍 reaction online).
What Are Images?
Before diving into napari, a quick conceptual grounding:
Images are arrays of numbers — each pixel has a value (brightness, intensity)
n-dimensional images — beyond rows and columns in an array, images can have more array indexes
zero-based indexing — the first element/pixel is at position 0, not 1
A common (but not universal) convention: TZYX ordering for time, depth, height, and width dimensions
multi-channel images — can be just another dimension in the array (e.g. RGB(A) is shape height, width, 3 (or 4))
labels — images where pixel values are integers representing categories (e.g. 0=background, 1=cell1, 2=cell2, etc.)
scale and units — each pixel corresponds to a real-world physical size
napari can display all of these — the dimension sliders let you navigate indexes beyond the 2D canvas.
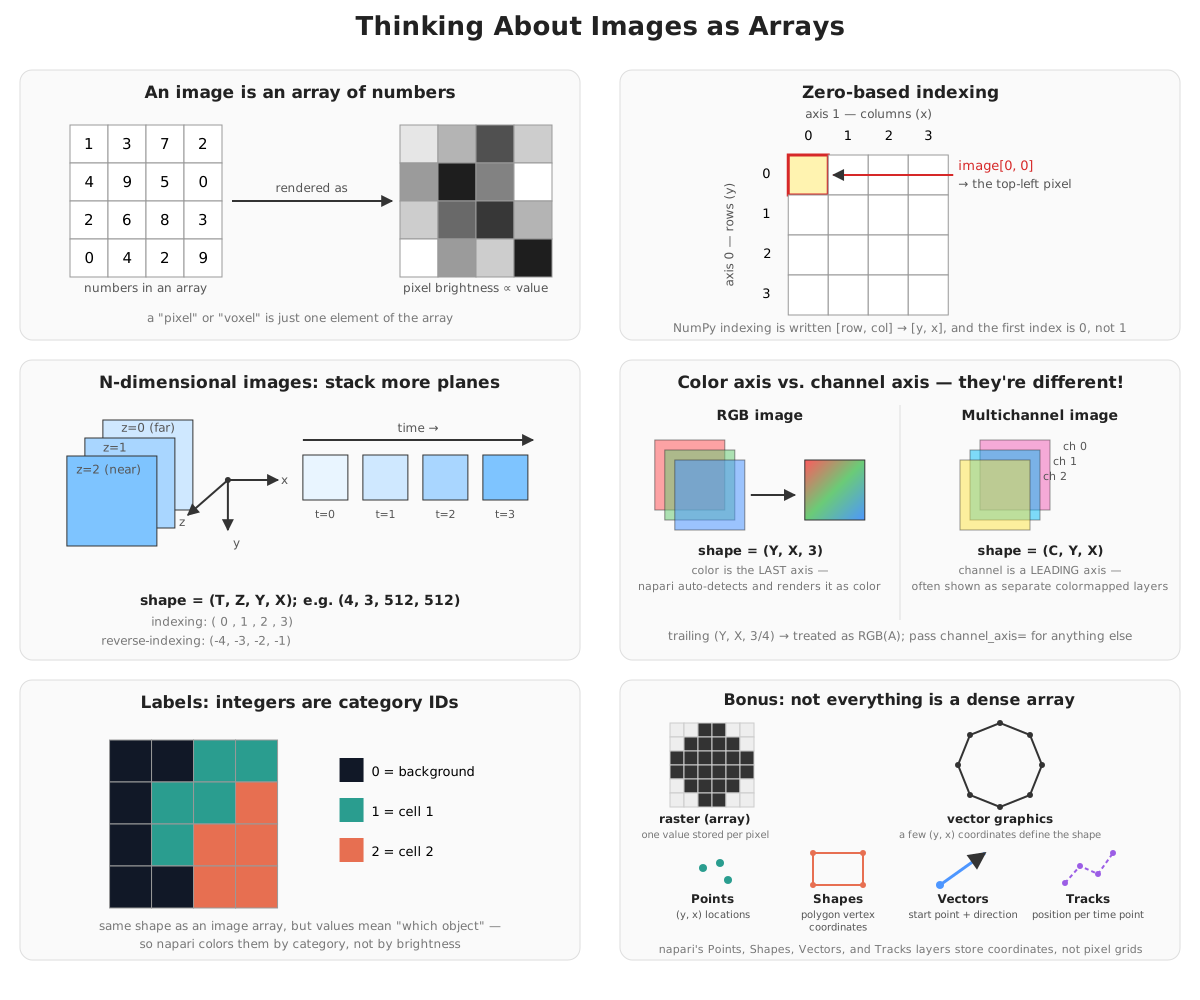
Open Your First Image and take Screenshots
In napari, select: File > Open Sample > napari builtins > Cells (3D + 2Ch)
Two layers appear in the layer list:
membraneandnucleiUse the dimension slider at the bottom to scroll through z-slices
Toggle each layer on/off with the eye icon next to its name
What you’re looking at: Confocal microscopy images of cells in 3D. The
nucleichannel (channel 1) shows cell nuclei stained with a dye. Themembranechannel (channel 0) shows cell membranes.
Screenshots
Save what you see in napari at any time:
File > Save Screenshot... — saves the canvas as an image file
File > Save Screenshot with Viewer — saves the canvas plus the entire GUI
File > Copy Screenshot to Clipboard — paste it directly into a document or chat
Keyboard shortcut: Alt+S (saves to file) or Alt+C (copies to clipboard).
Add Shift to include the viewer UI: Alt+Shift+S or Alt+Shift+C.