Contributing Documentation
This guide will teach you how to submit new documents to napari’s usage documentation.
Prerequisites
Prerequisites depend on the type of contribution you wish to make. In general you will require:
If you wish to add/amend documentation that does not contain code, you will also require:
A clean conda environment with napari docs dependencies installed:
You can install these with
pip install "napari[docs]"These dependencies will allow you to preview your document locally, as it would appear on
napari.orgThey will also install
jupytext, which you will need to contribute documents containing code or viewer interactions
If you wish to add/amend documentation that does contain code, you will also require:
A clean conda environment with a development installation of napari, see the contributor guide for details
Jupyter notebook installed
Familiarity with Jupyter notebooks (code cells and markdown cells)
Familiarity with using napari through a Jupyter notebook
0. Before you start
If you’d like to contribute a brand new document to our usage section, it might be worth opening an issue on our repository first to discuss the content you’d like to see and get some early feedback from the community. The napari team can also suggest what type of document would be best suited, and whether there are already existing documents that could be expanded to include the content you think is lacking.
Go to your local napari folder to find examples of documents you might want to contribute. The paths are listed in parentheses below.
Explanations (in
napari/docs/guides): in depth content about napari architecture, development choices and some complex featuresTutorials (in
napari/docs/tutorials): detailed, reproducible step by step guides, usually combining multiple napari features to complete a potentially complex taskHow-tos (in
napari/docs/howtos/): simple step by step guides demonstrating the use of common featuresExamples (in
napari/examples/): code examples of how to use napariGetting started (in
napari/docs/tutorials/fundamentals: these documents are a mix of tutorials and how-tos covering the fundamentals of installing and working with napari for beginners
Got materials for a workshop?
If you already have teaching materials e.g. recordings, slide decks or jupyter notebooks hosted somewhere, you can add links to these on our napari workshops page.
1. Write your documentation
Fork and clone our repository. If you are amending existing documentation, you can do so in your preferred text editor. If you wish to add a new tutorial or a how-to, we recommend you use our template.
Our goal is that all tutorials and how-tos are easily downloadable and executable by our users. This helps ensure that they are reproducible and makes them easier to maintain. We therefore provide a notebook template for our documents. Inside the template you’ll find handy tips for taking screenshots of the viewer, hiding code cells, using style guides and what to include in the required prerequisites section.
Jupyter notebooks are a great option for our documents, because they allow you to easily combine code and well formatted text in markdown. However, their raw JSON format is not great for version control, so we use MyST Markdown documents in our repository and on napari.org.
Make a copy of napari/docs/developers/documentation/docs_template.md.
You can edit the template directly in Jupyter notebook, or in your preferred text editor.
Already have a notebook?
If you have an existing .ipynb Jupyter notebook that you’d like to contribute, you can convert it to MyST markdown
and then edit the .md file to prepare it for contributing.
Run jupytext your-notebook.ipynb --to myst to create a new MyST version of your file,
your-notebook.md. Edit this file to include the relevant sections from the docs template.
Next steps
Depending on the type of contribution you are making, you may be able to skip some steps:
If you are adding new documentation and would prefer a simpler workflow, you can you can use the GitHub web interface to open your pull request. A member of the maintenance team will help with updating TOC and making sure your documentation has built correctly. You will also be able to preview the documentation yourself by downloading the built documentation via a link provided by a comment from the ‘github-actions’ bot.
If you are amending an existing document you can skip straight to Step #3 - Preview your document
For all other documentation changes, follow the steps below
2. Update TOC
If you are adding a new documentation file, you will need to add your document
to the correct folder based on its content (see the list above
for common locations), and update napari/docs/_toc.yml.
If you’re adding a document
to an existing group, simply add a new - file: entry in the appropriate spot. For example, if I wanted to add
a progress_bars.md how to guide, I would place it in napari/docs/howtos and update _toc.yml as below:
- file: howtos/index
subtrees:
- titlesonly: True
entries:
- file: howtos/layers/index
subtrees:
- titlesonly: True
    entries:
    - file: howtos/layers/image
    - file: howtos/layers/labels
    - file: howtos/layers/points
    - file: howtos/layers/shapes
    - file: howtos/layers/surface
    - file: howtos/layers/tracks
    - file: howtos/layers/vectors
- file: howtos/connecting_events
- file: howtos/napari_imageJ
- file: howtos/docker
- file: howtos/perfmon
- file: howtos/progress_bars # added
To create a new subheading, you need a subtrees entry. For example, if I wanted to add geo_tutorial1.md and geo_tutorial2.md
to a new geosciences subheading in tutorials, I would place my documents in a new folder napari/docs/tutorials/geosciences,
together with an index.md that describes what these tutorials would be about, and then update _toc.yml as below:
- file: tutorials/index
subtrees:
- entries:
    - file: tutorials/annotation/index
    subtrees:
    - entries:
        - file: tutorials/annotation/annotate_points
    - file: tutorials/processing/index
    subtrees:
    - entries:
        - file: tutorials/processing/dask
    - file: tutorials/segmentation/index
    subtrees:
    - entries:
        - file: tutorials/segmentation/annotate_segmentation
    - file: tutorials/tracking/index
    subtrees:
    - entries:
        - file: tutorials/tracking/cell_tracking
    - file: tutorials/geosciences/index                 # added
    subtrees:                                           # added
    - entries:                                          # added
        - file: tutorials/geosciences/geo_tutorial1     # added
        - file: tutorials/geosciences/geo_tutorial2     # added
3. Preview your document
If your documentation change includes code, it is important that you ensure the code is working and executable. This is why you will need to have a development installation of napari installed. Examples are automatically executed when the documentation is built and code problems can also be caught when previewing the built documentation. If your documentation change does not include code, you only need the napari docs dependencies installed.
There are two ways you can preview the documentation website, by building locally or downloading the GitHub Actions built documentation when you submit your pull request.
To build the documentation locally, run make docs from the root of
the napari repository (assuming you’ve installed the docs prerequisites).
make docs
The rendered HTML will be placed in napari/docs/_build. Find index.html in this folder and drag it
into a browser to preview the website with your new document.
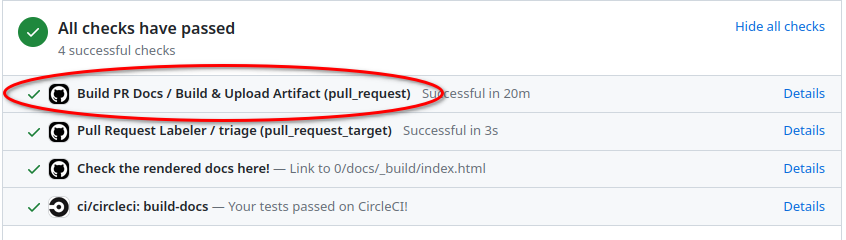
Alternatively, When you submit your pull request, napari continuous integration includes a GitHub action that builds the documentation and saves the artifact for you to download. This is another way to check that your built documentation looks as you expect. To download the built documentation, go to your PR, scroll down to the continuous integration tests, then:
click on ‘details’ next to ‘Build Docs / Build & Upload Artifact (pull_request)’
click on ‘summary’ on the top left corner
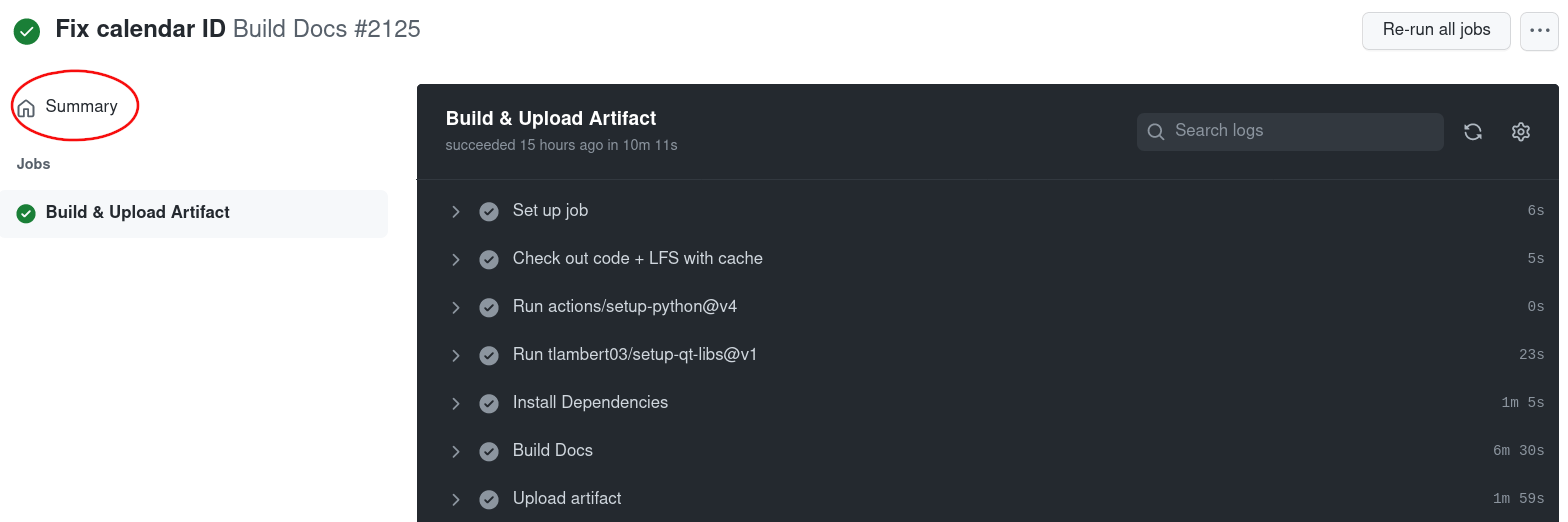
scroll down to ‘artifacts’ and click on ‘docs’ to download the built documentation

4. Submit your pull request
Once you have written and previewed your document, it’s time to open a pull request to napari’s main repository and contribute it to our codebase.
If you are simply contributing one file (e.g., a tutorial or how-to page) you can use the GitHub web interface to open your pull request. Ensure you document is added to the correct folder based on its content (see the list above for common locations).
To open a pull request via git and the command line, follow this guide. You can also reach out to us on zulip for assistance!
Not sure where to place your document or update _toc.yml? Make a best guess and open the pull request - the napari team will
help you edit your document and find the right spot!