Contributing Documentation#
This guide will teach you how to submit new documents to napari’s usage documentation.
Organization of the documentation#
The napari documentation is built from multiple sources that are organized into repositories:
The main napari documentation is built from sources located at the napari/docs repository on GitHub. That repository is where all the narrative documentation (e.g. tutorials, how-to guides, etc. on napari.org) pull requests should be made. This narrative napari documentation is written in MyST markdown, a version of commonmark Markdown (see a markdown cheatsheet) with some additional features.
Some of the documentation about plugins resides in the napari/npe2 repository (e.g. the contributions reference page) and should be modified there. This is documentation is written with Jinja.
The examples gallery is generated from Python source files and changes to the gallery should be made to the napari/napari repository (see also the guide on adding examples to the gallery).
Changes to how napari.org appears site-wide are made to the napari-sphinx-theme.
The API reference documentation is autogenerated from the napari source code docstrings. Docstrings are written in the reStructuredText format and any modifications to them should be submitted to the napari/napari repository.
Contributing to the napari documentation without a local setup#
If you would like to see new documentation added to napari or want to see changes to existing documentation, but are not clear on these instructions or don’t have the time to write it yourself, you can open an issue.
If you are adding new documentation or modifying existing documentation and would prefer a simpler workflow than the local setup guide described below, you can use the GitHub web interface to open your pull request by either uploading file(s) from your computer, creating and editing a new file or editing an existing file on the napari-docs GitHub repository. It’s best if you first fork the napari-docs repository to your own GitHub account, create a feature branch, upload/create/edit files through the GitHub web interface, and then open a pull request from your fork back to napari-docs.
You will also be able to preview the documentation as it would appear on napari.org by
using the Check the rendered docs here! action at the bottom of your PR which will go to a preview site on CircleCI.
A member of the maintenance
team will help with updating the napari.org table of contents where necessary (by placing a reference to your new file in docs/_toc.yml) and making sure your documentation has built correctly.
Prerequisites for a local setup to contribute to the napari documentation#
Prerequisites depend on the type of contribution you wish to make. In general, you will require:
Note
The napari documentation is built using make which does not work on paths which contain spaces.
It is important that you clone the napari/docs repository to a path that does not contain spaces.
For example, C:\Users\myusername\Documents\GitHub\napari-docs is a valid path, but
C:\Users\my username\Documents\GitHub\napari-docs is not.
You should first fork
and then clone the napari/napari and the napari/docs repositories to your
machine. To clone these repositories, you can follow any of the options in the GitHub guide to cloning (if you run into issues refer to the troubleshooting guide).
We recommend installing the GitHub CLI as it is easy to set up repository access permissions from the GitHub CLI and it comes with additional upside, such as the ability to checkout pull requests.
After installing the GitHub CLI you can run:
gh repo clone <your-username>/napari
gh repo clone <your-username>/docs napari-docs
Note
To reduce confusion and possible conflicts, the docs fork is being cloned into
a local repository folder named napari-docs. Alternately, you could also
rename the repository when forking napari/docs to napari-docs and then clone it via gh repo clone <your-username>/napari-docs.
Next, navigate to your local clone of the napari/docs repository:
cd napari-docs/
Since the API reference documentation (autogenerated from the napari code docstrings) and the example gallery are sourced from the napari/napari repository, before you can build the documentation locally, you need:
a clean
condaenvironment;a development installation of napari. Follow the contributor guide for details on how to do this;
the napari documentation requirements. Starting at the folder where you cloned the
napari/docsrepository, and after activating your cleancondaenvironment, you can install these withpython -m pip install -r requirements.txt.
This setup, with these dependencies, will allow you to preview your document locally as it would appear on napari.org. It will also install Jupyter notebook and jupytext, which you will need to contribute documents containing code or viewer interactions.
0. Before you start#
If you’d like to contribute a brand new document to our usage section, it might be worth opening an issue on our repository first to discuss the content you’d like to see and get some early feedback from the community. The napari team can also suggest what type of document would be best suited, and whether there are already existing documents that could be expanded to include the content you think is lacking.
Go to your local napari/docs folder to find examples of documents you might
want to contribute. The paths are listed in parentheses below.
Explanations (in
napari/docs/guides): in depth content about napari architecture, development choices and some complex featuresTutorials (in
napari/docs/tutorials): detailed, reproducible step by step guides, usually combining multiple napari features to complete a potentially complex taskHow-tos (in
napari/docs/howtos): simple step by step guides demonstrating the use of common featuresGetting started (in
napari/docs/tutorials/fundamentals): these documents are a mix of tutorials and how-tos covering the fundamentals of installing and working with napari for beginners
The Examples gallery sources are in the main napari/napari repository
and show code examples of how to use napari.
Got materials for a workshop?
If you already have teaching materials e.g. recordings, slide decks or Jupyter notebooks hosted somewhere, you can add links to these on our napari workshops page.
1. Write your documentation#
Our goal is that all tutorials and how-tos are easily downloadable and executable by our users. This helps ensure that they are reproducible and makes them easier to maintain. Jupyter notebooks are a great option for our documents, because they allow you to easily combine code and well formatted text in markdown and can be executed automatically. However, their raw JSON format is not great for version control, so we use MyST Markdown documents in our repository and on napari.org.
If you are amending existing documentation, you can do so in your preferred text editor. If you wish to add a new tutorial or a how-to, we recommend you use our template. Inside the template you’ll find handy tips for taking screenshots of the viewer, hiding code cells, using style guides and what to include in the required prerequisites section.
To use the template, make a copy of docs/developers/documentation/docs_template.md
and rename it to match your content. You can edit the template directly in
Jupyter notebook, or in your preferred text editor.
Already have a notebook?
If you have an existing .ipynb Jupyter notebook that you’d like to contribute, you can convert it to MyST markdown
and then edit the .md file to prepare it for contributing.
Run jupytext your-notebook.ipynb --to myst to create a new MyST version of your file,
your-notebook.md. Edit this file to include the relevant sections from the docs template.
How to check for broken links
If you have modified lots of document links, you can check that they all work by running make linkcheck-files in the napari/docs folder. However, this can take a long time to run, so if you have only modified a links in a single document, you can run:
make linkcheck-files FILES=path/to/your/document.md
Next steps#
Depending on the type of contribution you are making, you may be able to skip some steps:
If you are amending an existing document you can skip straight to Step #3 - Preview your document
For all other documentation changes, follow the steps below.
2. Update the table of contents (TOC)#
If you are adding a new documentation file, you will need to add your document
to the correct folder based on its content (see the list above
for common locations), and update docs/_toc.yml.
If you’re adding a document
to an existing group, simply add a new - file: entry in the appropriate spot. For example, if I wanted to add
a progress_bars.md how to guide, I would place it in docs/howtos and update _toc.yml as below:
- file: howtos/index
subtrees:
- titlesonly: True
entries:
- file: howtos/layers/index
subtrees:
- titlesonly: True
    entries:
    - file: howtos/layers/image
    - file: howtos/layers/labels
    - file: howtos/layers/points
    - file: howtos/layers/shapes
    - file: howtos/layers/surface
    - file: howtos/layers/tracks
    - file: howtos/layers/vectors
- file: howtos/connecting_events
- file: howtos/napari_imageJ
- file: howtos/docker
- file: howtos/perfmon
- file: howtos/progress_bars # added
To create a new subheading, you need a subtrees entry. For example, if I wanted to add geo_tutorial1.md and geo_tutorial2.md
to a new geosciences subheading in tutorials, I would place my documents in a new folder docs/tutorials/geosciences,
together with an index.md that describes what these tutorials would be about, and then update _toc.yml as below:
- file: tutorials/index
subtrees:
- entries:
    - file: tutorials/annotation/index
    subtrees:
    - entries:
        - file: tutorials/annotation/annotate_points
    - file: tutorials/processing/index
    subtrees:
    - entries:
        - file: tutorials/processing/dask
    - file: tutorials/segmentation/index
    subtrees:
    - entries:
        - file: tutorials/segmentation/annotate_segmentation
    - file: tutorials/tracking/index
    subtrees:
    - entries:
        - file: tutorials/tracking/cell_tracking
    - file: tutorials/geosciences/index                 # added
    subtrees:                                           # added
    - entries:                                          # added
        - file: tutorials/geosciences/geo_tutorial1     # added
        - file: tutorials/geosciences/geo_tutorial2     # added
3. Preview your document#
If your documentation change includes code, it is important that you ensure the code is working and executable. This is why you will need to have a development installation of napari installed. Examples are automatically executed when the documentation is built and code problems can also be caught when previewing the built documentation.
There are two ways you can build and preview the documentation website as it would appear on napari.org: by building locally, or downloading the GitHub Actions built documentation when you submit your pull request.
Tip
To see the markdown document structure and content change in real-time without building, you can use a MyST markdown preview tool like VScode with the MyST extension or MyST live preview. This can also help you to spot any markdown formatting errors that may have occurred. However, this MyST markdown preview will have some differences to the final built html documentation due to autogeneration, so it is still important to build and preview the documentation before submitting your pull request.
3.1. Building locally#
To build the documentation locally from scratch, run make docs from the root
of your local clone of the napari/docs repository (assuming you’ve installed
the docs prerequisites).
make docs
If the changes you have made to documentation don’t involve changing the napari gallery,
you can speed up this build by running make html-noplot instead. This will skip the
gallery build, which involves launching up napari and rendering all the examples.
make docs-install
make html-noplot
The rendered HTML will be placed in docs/_build. Find index.html in this
folder and drag it into a browser to preview the website with your new document.
You can also run this Python one-liner to deploy a quick local server on
http://localhost:8000:
$ python3 -m http.server --directory docs/_build
Note
The make docs command above assumes you have a local clone of the
napari/napari repo at the same level as
the napari/docs clone. If that’s not the case, you can specify the location of
the examples gallery folder by executing
make docs GALLERY_PATH=<path-to-examples-folder>
The GALLERY_PATH option must be given relative to the docs folder. If your
folder structure is
├── napari-docs
│   └── docs
├── napari
│   ├── binder
│   ├── examples
│   ├── napari
│   ├── napari_builtins
│   ├── resources
│   └── tools
Then the command would be
make docs GALLERY_PATH=../../napari/examples
Update documentation on file change
There’s another make task you can use for live previews while editing docs:
$ make html-live
# or for faster reloads:
$ make html-live SPHINXOPTS="-j4"
The first run will take a bit longer and a few napari instances will pop up
here and there, but the successive ones (triggered automatically every time
you save a file under docs/) will be faster!
The browser preview will open up automatically at http://127.0.0.1,
no need for further action! Edit the documents at will, and the browser will
auto-reload.
Once you are done with the live previews, you can exit via Ctrl+C
on your terminal.
Tip
If you have xvfb
installed on your system, you can also run a “headless GUI” build by using the
docs-xvfb command:
$ make docs-xvfb
This will prevent all but the first napari window from being shown during the docs build.
3.2. Use the CI artifacts#
Alternatively, when you submit your pull request, the napari docs repository continuous integration includes a GitHub action that builds the documentation and saves the artifact for you to download. This is another way to check that your built documentation looks as you expect. To download the built documentation, go to your PR, scroll down to the continuous integration tests, then:
Click on Details next to
Build PR Docs / Build & Upload Artifact (pull_request):
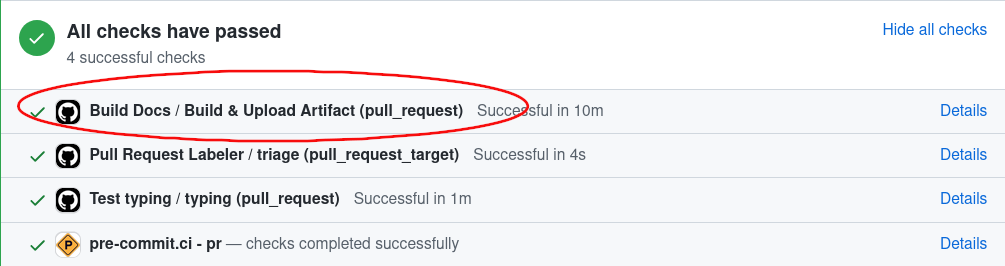
Click on Summary on the top left corner:
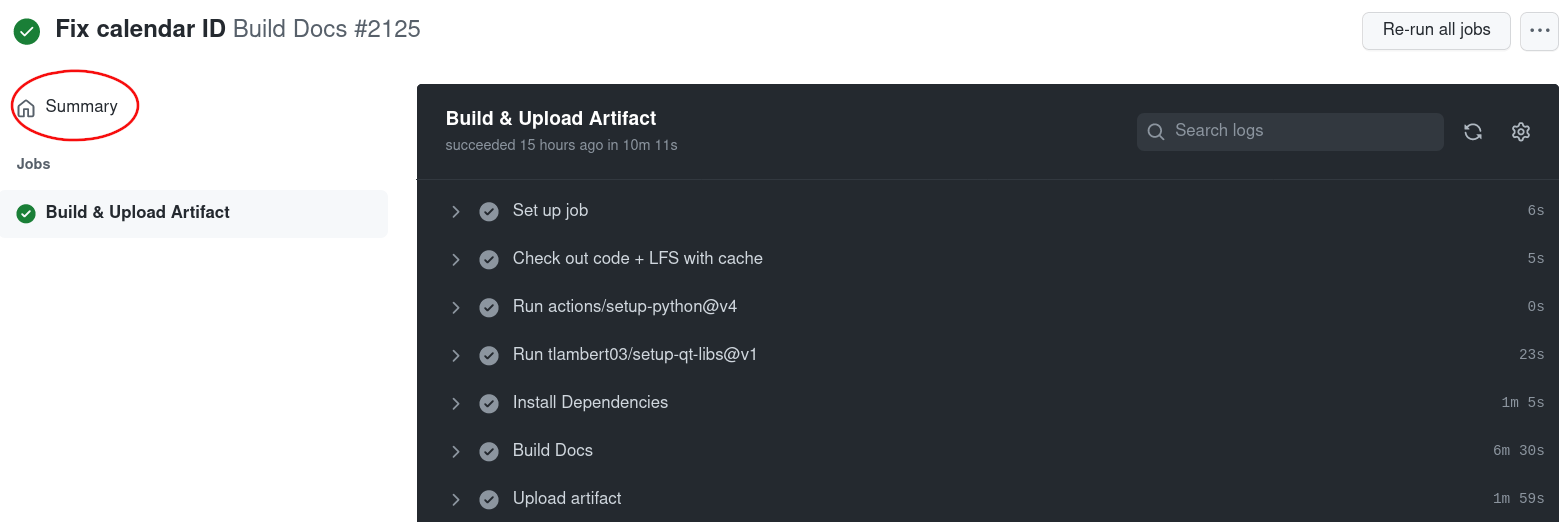
Scroll down to Artifacts and click on docs to download the built documentation:

Extract the compressed archive and open the
docs/index.htmlfile on your preferred browser. You can also use Python’shttp.servermodule to open a local server on http://localhost:8000:
$ cd ~/Downloads/docs  # or the path where you extracted the 'docs' artifact
$ python3 -m http.server
4. Submit your pull request#
Once you have written and previewed your document, it’s time to open a pull request to napari’s docs repository and contribute it to our codebase.
If you are simply contributing one file (e.g., a tutorial or how-to page) you can use the GitHub web interface to open your pull request. Ensure your document is added to the correct folder based on its content (see the list above for common locations).
To open a pull request via git and the command line, follow this guide. You can also reach out to us on zulip for assistance!
Not sure where to place your document or update _toc.yml? Make a best guess and open the pull request - the napari team will
help you edit your document and find the right spot!
Building the documentation on Windows#
The documentation build requires some Linux specific commands, so some extra steps are required to build the documentation on Windows. There are multiple tools for this, but Git Bash or Windows Subsystem for Linux (WSL) are recommended.
Git Bash#
First, you will need to install make on Windows:
Install Chocolatey (a Windows package manager) by following the instructions here.
Install
makewithchoco install make.
Alternatively, you can download the latest make binary without guile from ezwinports and add it to your PATH.
Then install Git Bash and build the documentation:
Install Git Bash (you should already have this if you use
giton Windows).Activate your virtual environment in Git Bash.
Conda environment: To have your conda environment available in Git Bash, launch Git Bash, then run
conda init bashfrom anaconda prompt and restart Git Bash. The conda environment can then be activated from Git Bash withconda activate <env_name>.Virtualenv: To have your virtualenv available in Git Bash, launch Git Bash, then run
source <path_to_virtualenv>/Scripts/activate.
From Git Bash,
cdto the napari docs repository and runmake docsor othermakecommands to build the documentation.
Tip
If you use Git Bash a lot, you may want to set conda to not initialize on bash by default to speed up the launch process. This can be done with conda config --set auto_activate_base false. You can then activate conda in Git Bash with conda activate base.
Note
If you are using an IDE, it is likely that it will not use Git Bash by default. You may need to configure your IDE to use Git Bash as the default terminal for the napari docs. For example, in VS Code, you can set the default terminal to Git Bash for the napari docs repository by adding the following to your workspace settings:
"terminal.integrated.defaultProfile.windows": "Git Bash"
Windows Subsystem for Linux (WSL)#
Alternatively, you can install WSL, which will allow you to run a Linux environment directly on Windows (without any virtual machines, etc.). You need to have Windows 10 version 2004 and higher or Windows 11. Then you can run scripts and command line utilities, as well as python and napari from for example Ubuntu on your Windows machine.
Install the Windows Subsystem for Linux and choose a linux distribution. We will use Ubuntu for this guide since it is the default WSL distribution, easy to install, and works well with WSLg. The default method to perform this installation is to run
wsl --install -d Ubuntufrom command prompt as an administrator but you can refer to the guide for other installation methods.Restart your computer. On restart, you will be prompted to create a user account for WSL. This account is separate from your Windows account, but you can use the same username and password if you wish.
Open up the Ubuntu distribution via the
Ubuntucommand and runsudo apt update && sudo apt upgradeto update the distribution.Install a napari development environment in Ubuntu following the contributor guide and activate the virtual environment that napari was installed into.
Install some common QT packages and OpenGL
sudo apt install -y libdbus-1-3 libxkbcommon-x11-0 libxcb-icccm4 libxcb-image0 libxcb-keysyms1 libxcb-randr0 libxcb-render-util0 libxcb-xinerama0 libxcb-xinput0 libxcb-xfixes0 mesa-utils libglu1-mesa-dev freeglut3-dev mesa-common-dev '^libxcb.*-dev' libx11-xcb-dev libxrender-dev libxi-dev libxkbcommon-dev libxkbcommon-x11-dev.You can test that all of this OpenGL setup is working by running
glxgearsfrom the Ubuntu terminal. You should see a window with some gears spinning.sudo apt install fontconfig.pip install pyqt5-tools.Fork the napari docs repository and clone it to the same parent folder as the napari repository (see Prerequisites for a local setup to contribute to the napari documentation). Then navigate to the napari docs folder via
cd napari-docs.Install
makewithsudo apt install make.Run
make docsor othermakecommands to build the documentation.
Route graphical output to Windows
By default, the graphical interface to glxgears or napari from WSL should be visible on Windows via WSLg without any configuration.
However, if you are getting errors running glxgears or can’t see the interface to graphical applications, then you may need to route the graphical output to Windows. To do this:
Install an Xserver for Windows, Vcxsrv. When launching it, choose the options as default, except tick “disable access control”.
Export environment variables (you will need to do this for every new shell you open, unless you add them to your
.bashrc):mkdir ~/temp export DISPLAY=$(awk '/nameserver / {print $2; exit}' /etc/resolv.conf 2>/dev/null):0 export LIBGL_ALWAYS_INDIRECT=0 export XDG_RUNTIME_DIR=~/temp export RUNLEVEL=3
Run
glxgearsfrom the Ubuntu terminal. You should see a window with some gears spinning.